
Mongolian Beef Recipe; Craving that sticky, savory Mongolian beef you love from your favorite Chinese-American restaurant? The good news: you can make it at home in just 30 minutes — and it tastes even better. This easy Mongolian beef recipe features ultra-tender sliced flank steak coated in a rich, glossy sauce made with soy sauce, brown sugar, garlic, and fresh ginger.
Whether you serve it over steamed white rice, fried rice, or noodles, this dish is guaranteed to become a weeknight favorite. Let’s dive into everything you need to know — from ingredients and step-by-step instructions to pro cooking tips and variations.
Recipe at a Glance
| Detail | Info |
| Prep Time | 10 minutes |
| Cook Time | 20 minutes |
| Total Time | 30 minutes |
| Servings | 4 servings |
| Cuisine | Chinese-American |
| Difficulty | Easy |
| Best Served With | Steamed rice, fried rice, or lo mein noodles |
What Is Mongolian Beef?
Despite its name, Mongolian beef is not actually a traditional dish from Mongolia. It was popularized by Chinese-American restaurants and is widely associated with P.F. Chang’s style cuisine. The dish features thinly sliced beef — typically flank steak — that is lightly coated in cornstarch, flash-fried until crispy, then tossed in a bold sauce made from soy sauce, hoisin, brown sugar, garlic, and ginger.
The result is an irresistible combination of sweet, salty, and umami-rich flavors with a melt-in-your-mouth texture. Green onions are classically added at the end for freshness and color.
Mongolian Beef Ingredients
Here is everything you need for this homemade Mongolian beef recipe. All ingredients are easy to find at your local grocery store or Asian market.
For the Beef
| Ingredient | Amount & Notes |
| Flank steak | 1.5 lbs — thinly sliced against the grain |
| Cornstarch | 1/3 cup — for coating; creates a crispy exterior |
| Vegetable oil | 3 tablespoons — for frying |
| Salt & pepper | A pinch — to season the steak slices |
For the Mongolian Beef Sauce
| Ingredient | Amount & Notes |
| Low-sodium soy sauce | 1/2 cup — the savory base of the sauce |
| Brown sugar | 1/3 cup packed — adds sweetness and caramelization |
| Water | 1/4 cup — helps thin the sauce |
| Hoisin sauce | 2 tablespoons — adds depth and a slight sweetness |
| Sesame oil | 1 teaspoon — for nutty, authentic flavor |
| Fresh garlic | 4 cloves, minced — essential for bold flavor |
| Fresh ginger | 1 tablespoon, grated — brightens the entire dish |
| Red pepper flakes | 1/2 teaspoon — optional for a gentle kick |
| Cornstarch slurry | 1 tablespoon cornstarch + 2 tbsp water — to thicken sauce |
For Serving
- 4 green onions (scallions), sliced into 1-inch pieces
- Toasted sesame seeds (optional garnish)
- Steamed white rice or jasmine rice
- Chili flakes or chili oil — optional for extra heat
How to Make Mongolian Beef: Step-by-Step Instructions
Follow these simple steps to make restaurant-quality Mongolian beef at home. The key is to work quickly with high heat — just like a real wok kitchen.
Step 1: Slice and Coat the Beef
- Freeze the flank steak for 20–30 minutes before slicing — this firms it up and makes thin slicing much easier.
- Using a sharp knife, slice the steak into thin strips (about 1/4 inch thick) cutting against the grain. This is the most important step for tender beef.
- Pat the strips dry with paper towels to remove excess moisture.
- Toss the beef strips in cornstarch until each piece is evenly coated. Shake off any excess. Set aside.
Step 2: Make the Mongolian Beef Sauce
- In a small bowl or measuring cup, whisk together: soy sauce, brown sugar, water, hoisin sauce, sesame oil, minced garlic, grated ginger, and red pepper flakes (if using).
- Stir until the brown sugar is dissolved. Set the sauce aside.
- In a separate tiny bowl, mix 1 tablespoon cornstarch with 2 tablespoons cold water to create a slurry. Set aside.
Step 3: Fry the Beef
- Heat vegetable oil in a large wok or heavy-bottomed skillet over HIGH heat until the oil is shimmering and almost smoking.
- Add the beef strips in a SINGLE LAYER — do not overcrowd the pan! Cook in 2–3 batches if needed.
- Fry each batch for 1–2 minutes per side without moving, until a golden-brown crust forms. Transfer to a plate lined with paper towels.
| PRO TIP: Overcrowding the pan causes the beef to steam instead of fry, resulting in soggy rather than crispy beef. Always cook in batches for best results. |
Step 4: Build the Sauce
- In the same wok, reduce heat to medium-high. Add the sauce mixture and bring it to a gentle simmer.
- Cook for 2–3 minutes, stirring occasionally, until the sauce starts to reduce and darken.
- Pour in the cornstarch slurry and stir continuously. The sauce will thicken noticeably within 30–60 seconds.
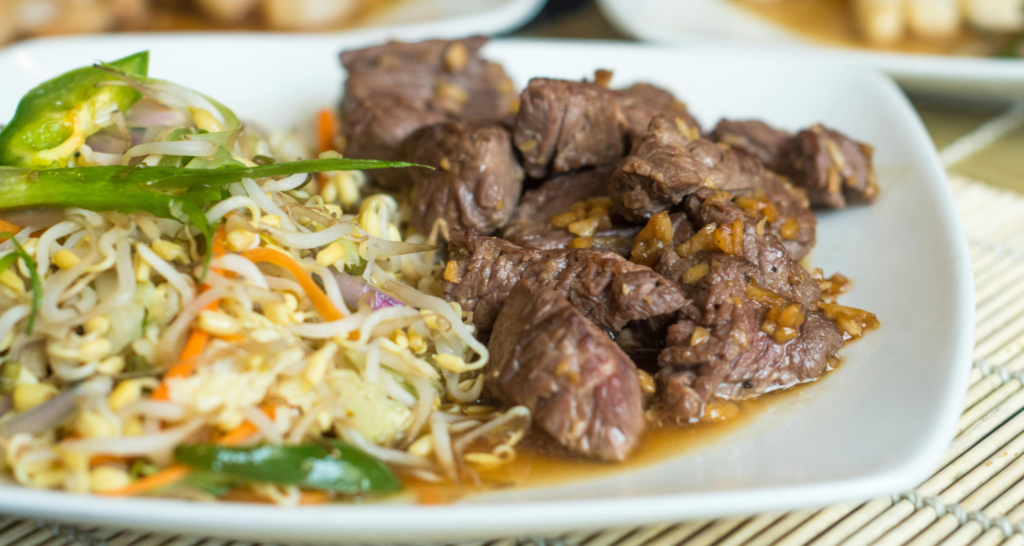
Step 5: Combine and Finish
- Return the fried beef to the wok and toss to coat every piece in the thick, glossy sauce.
- Add the green onion pieces and toss for another 30 seconds just to warm them.
- Remove from heat and plate immediately over steamed rice.
- Garnish with toasted sesame seeds and extra green onion slices. Serve hot.
Expert Cooking Tips for the Best Mongolian Beef
These pro tips will take your homemade Mongolian beef from good to absolutely exceptional:
Tip 1: Always Slice Against the Grain
Cutting against the grain shortens the muscle fibers, making the beef significantly more tender. Look for the direction the lines run in the meat and slice perpendicular to them.
Tip 2: Use High Heat
Mongolian beef is a stir-fry dish that needs very high heat to achieve that restaurant-style sear. A cast iron skillet or a wok is ideal. Don’t be afraid to crank up the burner.
Tip 3: Don’t Skip the Cornstarch
Cornstarch is a non-negotiable in this recipe. It creates a slightly crispy crust on the beef that holds the sauce and gives the dish its signature texture. It also helps thicken the sauce naturally.
Tip 4: Taste and Adjust the Sauce
Before adding the beef back in, taste your sauce. Want it sweeter? Add a touch more brown sugar. Want more depth? Add a dash more hoisin. This is your recipe — make it yours.
Tip 5: Use Low-Sodium Soy Sauce
Regular soy sauce can make this dish very salty. Low-sodium soy sauce gives you the same umami punch without overwhelming saltiness. It also allows you to control the seasoning better.
Mongolian Beef Variations & Substitutions
One of the best things about this recipe is how versatile it is. Here are some popular variations:
Different Protein Options
- Mongolian Chicken: Substitute thinly sliced chicken breast or thigh — equally delicious.
- Mongolian Pork: Use pork tenderloin sliced thin for a slightly different but wonderful flavor profile.
- Mongolian Tofu: Press extra-firm tofu, cube it, coat in cornstarch, and fry — great for a vegetarian version.
- Mongolian Shrimp: Use large shrimp with the same coating — reduce the cooking time to 1 minute per side.
Add Vegetables
- Broccoli — a classic pairing; blanch separately and toss with beef in sauce
- Bell peppers (red or yellow) — add color and sweetness
- Snap peas or snow peas — add fresh crunch
- Mushrooms — shiitake or cremini work beautifully
Make It Spicy
To create a spicy Mongolian beef, increase red pepper flakes to 1 full teaspoon, add 1 tablespoon of sambal oelek or sriracha to the sauce, and finish with a drizzle of chili oil when plating.
What to Serve with Mongolian Beef
Mongolian beef pairs beautifully with a variety of sides. Here are the best options:
| Side Dish | Why It Works |
| Steamed Jasmine Rice | Classic pairing; the rice soaks up the sauce perfectly |
| Fried Rice | Adds texture and makes it an all-in-one satisfying meal |
| Lo Mein Noodles | Great for a noodle bowl presentation |
| Cauliflower Rice | Perfect low-carb option |
| Steamed Broccoli | Balances the richness with fresh green flavor |
| Asian Cucumber Salad | Adds a cool, refreshing contrast to the savory beef |
Storage, Reheating & Meal Prep Tips
Refrigerator Storage
Store leftover Mongolian beef in an airtight container in the refrigerator for up to 4 days. The flavors actually deepen overnight, making leftovers taste even better the next day.
Freezer Storage
This dish freezes well! Let it cool completely, then transfer to a freezer-safe bag or container. Freeze for up to 3 months. Thaw overnight in the refrigerator before reheating.
Reheating
Reheat in a skillet over medium heat with a splash of water or broth to loosen the sauce. Microwaving works in a pinch — cover loosely and heat in 60-second intervals, stirring in between.
Meal Prep
You can prep several components ahead of time to make this recipe even faster on a busy weeknight: slice and marinate the beef, whisk together the sauce (store in a jar), and cook the rice in advance. When ready to eat, the final dish comes together in under 15 minutes.
Nutritional Information (Per Serving)
The following is an estimate based on the recipe as written. Values will vary depending on portion size and specific brands used.
| Nutrient | Estimated Amount |
| Calories | 420 kcal |
| Protein | 36g |
| Carbohydrates | 28g |
| Fat | 18g |
| Sodium | 820mg |
| Sugar | 14g |
| Fiber | 1g |
| Nutrition Tip: To reduce sodium, use coconut aminos instead of soy sauce. To lower the sugar content, reduce brown sugar to 1/4 cup — the dish will still be delicious. |
Frequently Asked Questions (FAQ)
Can I use a different cut of beef for Mongolian beef?
Yes! While flank steak is the most traditional cut, you can also use skirt steak, sirloin, or even ribeye. The key is to slice the beef very thin and always against the grain. Avoid stew meat or chuck — these cuts require low-and-slow cooking to become tender.
Why is my Mongolian beef sauce not thickening?
If your sauce is not thickening, it is likely that the heat is too low or you need more cornstarch slurry. Make sure the sauce is at a steady simmer before adding the slurry, and stir continuously as you pour it in. Wait at least 60 seconds before adding more thickener.
Is Mongolian beef gluten-free?
Traditional Mongolian beef is not gluten-free due to the soy sauce. To make it gluten-free, substitute tamari or coconut aminos for the soy sauce, and use a certified gluten-free hoisin sauce. Check all labels carefully.
Can I make Mongolian beef ahead of time?
You can make the sauce and prep the beef ahead of time, but for the best texture, fry the beef and combine everything fresh. If you make the full dish in advance, reheat it in a skillet rather than the microwave to help restore some of the beef’s crispiness.
What makes Mongolian beef different from beef with broccoli?
Mongolian beef is sweeter and saucier, with a bolder garlic-ginger flavor profile and a focus on green onions. Beef with broccoli has a lighter, more savory oyster-sauce-based sauce and obviously features broccoli as a key component. Both are delicious Chinese-American classics.
Conclusion
This easy Mongolian beef recipe is everything you want from a takeout-style dish — rich, savory, slightly sweet, and loaded with bold garlic-ginger flavor — made right in your own kitchen in 30 minutes or less.
Whether you are cooking for a weeknight dinner, meal-prepping for the week, or impressing guests at a dinner party, this recipe delivers consistent, delicious results every single time. Once you try the homemade version, you may never order it from a restaurant again.
Give this recipe a try tonight and let us know in the comments below: Did you follow the recipe as-is, or did you put your own twist on it? We love hearing from you!
| Loved this recipe? Pin it to your Pinterest board, share it on Facebook, or tag us on Instagram @YourBlog with your Mongolian beef creations! |
You Might Also Enjoy
- Easy Beef and Broccoli Stir Fry (Restaurant Style)
- General Tso’s Chicken: Crispy, Sweet & Spicy
- Honey Garlic Shrimp — Ready in 15 Minutes
- The Best Homemade Fried Rice Recipe
- Sesame Noodles with Peanut Sauce