
Rich, Flavorful Chicken
Rich, Flavorful Chicken : Homemade chicken stock transforms ordinary dishes into extraordinary culinary experiences. This liquid gold serves as the foundation for countless recipes, from comforting soups and savory sauces to perfectly cooked grains and braised meats. While store-bought versions offer convenience, nothing compares to the depth of flavor, nutritional benefits, and cost-effectiveness of stock made in your own kitchen.

This comprehensive guide reveals everything you need to know about creating restaurant-quality chicken stock at home. You’ll discover professional techniques, learn to maximize flavor extraction, and master multiple cooking methods that fit any schedule. Whether you’re a seasoned home cook or just beginning your culinary journey, these detailed instructions will help you produce rich, gelatinous stock that elevates every dish it touches.
Why Make Chicken Stock from Scratch?
Before we dive into the recipe, let’s explore the compelling reasons to make your own stock rather than relying on store-bought alternatives.
Superior Flavor and Quality
Rich, Flavorful Chicken Homemade chicken stock delivers incomparable depth and complexity that boxed or canned versions simply cannot match. You control every ingredient, ensuring pure, clean flavors without artificial additives, excessive sodium, or preservatives.
The difference becomes immediately apparent when you taste homemade stock side-by-side with commercial products. Real stock made from bones and aromatics possesses a rich, savory quality with natural sweetness from vegetables and subtle complexity from long simmering. Store-bought versions often taste thin and overly salty, relying on flavor enhancers rather than genuine ingredients.
Nutritional Powerhouse
Properly made chicken stock contains collagen, gelatin, minerals, and amino acids extracted from bones during long, slow cooking. These nutrients support joint health, improve digestion, promote healthy skin, and may help reduce inflammation.
The gelatin content becomes visible when chilled stock solidifies into a jiggly consistency. This gelatin provides the amino acids glycine and proline, which play important roles in gut health and tissue repair. Bone broth enthusiasts celebrate these nutritional benefits, though traditional stock made with bones provides similar advantages.
Maximum Value from Your Food
Making stock represents the ultimate in zero-waste cooking. Chicken carcasses, vegetable scraps, and herb stems that would otherwise go in the trash transform into valuable cooking liquid. A single rotisserie chicken provides not only dinner but also the foundation for several more meals through the stock it produces.
Even if you buy chicken specifically for stock-making, the cost per serving remains far lower than quality store-bought stock. Chicken backs, necks, and feet cost very little but produce exceptionally rich, gelatinous stock. This economical approach to cooking stretches your grocery budget while improving meal quality.

Complete Control Over Sodium
Commercial stocks contain shocking amounts of sodium, sometimes exceeding 500 milligrams per cup. When you make your own stock, you control the salt level entirely. Many recipes call for unsalted stock, allowing you to season dishes precisely during cooking rather than compensating for pre-salted ingredients.
This control proves especially valuable for those monitoring sodium intake for health reasons. Homemade stock delivers all the flavor-enhancing properties without forcing you to consume excessive salt.
The Foundation of Great Cooking
Professional chefs understand that exceptional sauces, soups, and braises begin with superior stock. The French culinary tradition considers stock one of the mother sauces—fundamental preparations that form the basis of countless dishes.
Once you experience cooking with homemade stock, you’ll notice the difference it makes in everything you prepare. Rice becomes more flavorful when cooked in stock instead of water. Gravies and pan sauces gain body and complexity. Soups taste restaurant-quality rather than merely acceptable.
Understanding Stock vs. Broth vs. Bone Broth
These terms often create confusion, as they’re sometimes used interchangeably. However, important distinctions exist between these three preparations.
Traditional Stock

Stock is made primarily from bones with some meat attached, along with aromatic vegetables and herbs. The bones contain collagen that breaks down during long cooking, creating gelatin that gives stock body and a silky mouthfeel. Stock typically simmers for four to six hours, though longer cooking times produce richer results.
Traditional stock contains minimal seasoning—usually just vegetables and herbs—because it serves as a building block for other recipes. The final seasoning happens in the dish you’re preparing rather than in the stock itself.
Chicken Broth
Broth emphasizes meat more than bones, resulting in a lighter, less gelatinous liquid with prominent chicken flavor. Broth generally cooks for a shorter time than stock, typically two to three hours. The reduced cooking time produces a thinner consistency without the jellied texture of stock.
Broth is often seasoned more heavily during cooking and can be sipped on its own or used directly in recipes. Some cooks prefer broth’s cleaner, simpler flavor profile for certain applications.
Bone Broth
Bone broth represents an extended-cooking version of stock, often simmering for twelve to twenty-four hours or even longer. This prolonged cooking extracts maximum collagen, minerals, and nutrients from the bones. The result is an intensely flavored, deeply colored liquid that sets very firmly when chilled.
Bone broth has gained popularity in wellness communities for its concentrated nutritional benefits. However, from a culinary perspective, it functions similarly to well-made stock, just with more pronounced characteristics.
Which Should You Make?
For general cooking purposes, traditional stock offers the best versatility. It provides excellent body and flavor without being so concentrated that it overwhelms dishes. This guide focuses on classic stock-making techniques that produce liquid suitable for any recipe calling for chicken stock or broth.
Essential Ingredients for Perfect Chicken Stock
Quality stock begins with quality ingredients. Here’s what you need and why each component matters.
Chicken Bones and Parts
The foundation of excellent stock is bones with some meat attached. The best options include:
Chicken Backs and Necks: These inexpensive cuts contain abundant bones with enough meat to provide flavor. Many butchers sell them for less than a dollar per pound, making them the most economical choice. The high ratio of bone to meat produces excellent gelatin content.
Chicken Wings: Wings offer a good balance of bones, cartilage, and meat. They’re more expensive than backs and necks but more widely available. The cartilage contributes valuable collagen to the finished stock.
Whole Chicken Carcass: The leftover bones from a roasted chicken make wonderful stock. Include any skin, cartilage, and small bits of meat clinging to the bones. One carcass produces approximately six to eight cups of stock.
Chicken Feet: If you can find them, chicken feet produce incredibly gelatinous stock due to their high collagen content. They contain almost no meat, so combine them with other parts for balanced flavor. Asian markets often stock chicken feet.
Raw vs. Roasted Bones: Raw bones produce lighter-colored, cleaner-tasting stock perfect for delicate dishes. Roasted bones create darker, richer stock with more pronounced flavor ideal for hearty preparations.
Plan on using approximately three to four pounds of chicken bones and parts for every gallon of water. More bones relative to water produces richer, more concentrated stock.
Aromatic Vegetables
The classic French mirepoix forms the vegetable base for most stocks. This combination provides sweetness, depth, and complexity without overwhelming the chicken flavor.
Onions: Use yellow or white onions with the papery outer skins removed but the brown skins left on. These skins contribute beautiful golden color to the finished stock. Cut onions into large chunks—you’ll strain them out later, so precision isn’t necessary.
Carrots: Carrots add natural sweetness and contribute to stock’s appealing color. Scrub them well but don’t bother peeling. Cut into two-inch pieces. Use approximately half the amount of carrots as onions.
Celery: Including the leaves, celery provides aromatic complexity and subtle bitterness that balances the sweetness of other vegetables. Cut stalks into large pieces. Use roughly the same amount as carrots.
Garlic: A few smashed cloves add savory depth without dominating. Crush them gently with the flat side of a knife—no need to peel.
Avoid vegetables that become bitter or muddy with long cooking. Skip cruciferous vegetables like broccoli, cabbage, and Brussels sprouts. Avoid beets, which turn stock pink, and potatoes, which create cloudiness.
Herbs and Aromatics
Fresh herbs infuse stock with subtle complexity and pleasant aroma. The traditional bouquet garni includes:
Bay Leaves: These provide earthy, slightly floral notes. Two or three dried bay leaves suffice for a large pot of stock.
Parsley: Use stems rather than leaves, as they contain more flavor and won’t break down into bits that cloud the stock. A large handful of stems adds fresh, herbaceous notes.
Thyme: Fresh thyme sprigs contribute woodsy, slightly minty flavor. Four or five sprigs provide adequate seasoning without overpowering.
Peppercorns: Whole black peppercorns add gentle heat and complexity. About ten to fifteen peppercorns offer subtle warmth without making stock spicy.
Optional Additions: Some cooks add leek tops (the green parts often discarded from recipes), mushroom stems for earthiness, or a piece of fresh ginger for Asian-inspired stock.
Water Quality Matters
Since stock is primarily water, the water quality significantly affects the final product. If your tap water tastes heavily chlorinated or off-putting, consider using filtered water. However, most municipal water works perfectly well for stock-making.
Cold water is essential for beginning your stock. Starting with cold water and bringing it slowly to temperature allows proteins to dissolve gradually, creating clearer stock. Hot water causes proteins to coagulate quickly, resulting in cloudiness.
The Classic Chicken Stock Recipe
This foundational recipe produces approximately three quarts of rich, flavorful stock suitable for any application.
Ingredients
- 3 to 4 pounds chicken bones and parts (backs, necks, wings, or 1 to 2 carcasses)
- 4 quarts cold water
- 2 large onions, quartered (leave brown skin on)
- 2 large carrots, cut into 2-inch pieces
- 2 celery stalks, cut into 2-inch pieces
- 4 garlic cloves, smashed
- Large handful of fresh parsley stems
- 4 to 5 fresh thyme sprigs (or 1 teaspoon dried thyme)
- 2 bay leaves
- 10 whole black peppercorns
- Optional: 1 tablespoon apple cider vinegar (helps extract minerals from bones)
Step-by-Step Instructions
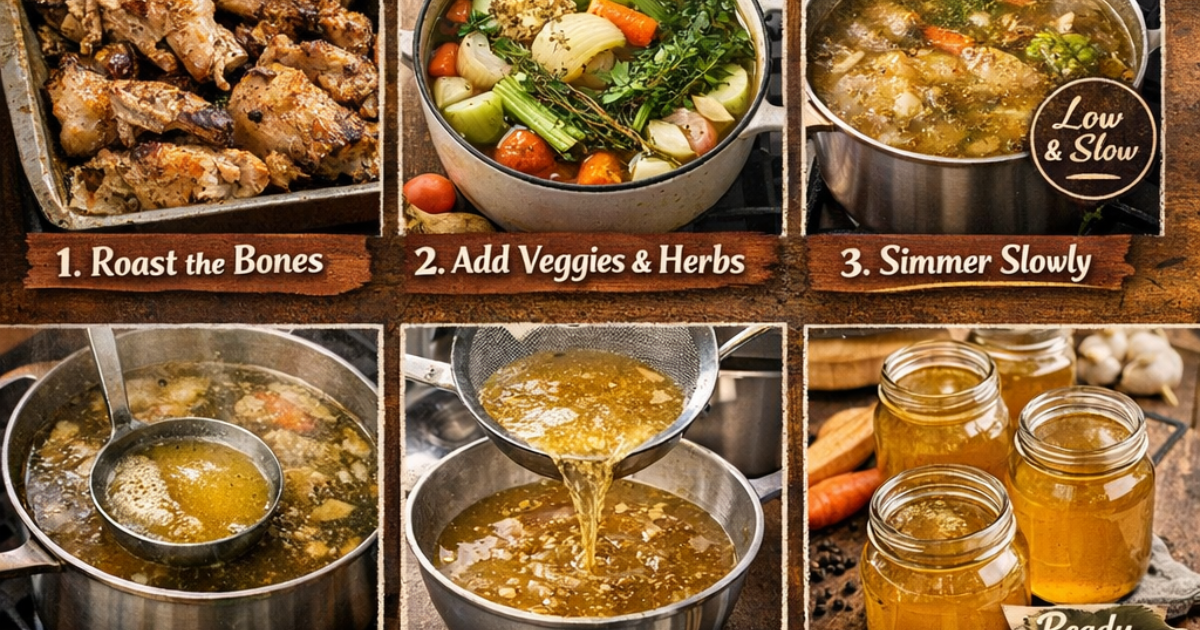
Step 1: Prepare the Bones
If using raw chicken parts, you can roast them first for deeper flavor and darker color. Preheat your oven to 400°F and arrange the chicken pieces in a single layer on a rimmed baking sheet. Roast for forty-five minutes to one hour until deeply browned. This step is optional but adds considerable flavor complexity.
If using a leftover roasted chicken carcass, break it into several pieces so it fits more easily in the pot and exposes more surface area to the water.
For chicken feet, if using them, bring a pot of water to a boil and blanch the feet for two minutes. Drain and rinse them under cold water. This removes any impurities and makes them easier to handle. Peel off the outer yellow skin if it hasn’t already been removed.
Step 2: Build Your Stock Pot
Place all the chicken bones and parts in a large stockpot or Dutch oven. Add the quartered onions, carrot pieces, celery chunks, and smashed garlic cloves. Toss in the parsley stems, thyme sprigs, bay leaves, and whole peppercorns.
If using apple cider vinegar, add it now. The acidic environment helps extract minerals from the bones, though this is optional and won’t dramatically affect flavor.
Pour the cold water over everything. The water should cover the ingredients by about one inch. If the bones are very crowded, you can press them down gently to submerge them. Don’t add too much water, as this dilutes the stock’s flavor.
Step 3: Bring to a Simmer Slowly
Place the pot over medium-high heat and bring it slowly to a bare simmer. This gradual heating is crucial for producing clear stock. As the water heats, you’ll notice foam and scum rising to the surface. This gray, foamy substance consists of proteins and impurities that will cloud your stock if left in.
Once the water reaches a simmer and foam begins appearing, reduce the heat to maintain just barely bubbling. The surface should show small, occasional bubbles rather than a rolling boil. Vigorous boiling makes stock cloudy by breaking down ingredients too aggressively and emulsifying fat into the liquid.
Step 4: Skim Regularly
For the first hour of cooking, check the pot every fifteen to twenty minutes and skim off any foam or scum that rises to the surface. Use a ladle or large spoon to remove this material gently. Skimming produces clearer, cleaner-tasting stock.
After the first hour, foam production decreases significantly. Continue skimming occasionally if you notice any accumulation, but it becomes less critical as cooking progresses.
Step 5: Simmer Low and Slow
Allow the stock to simmer very gently for four to six hours. The long cooking time extracts maximum flavor from the bones while breaking down collagen into gelatin. Check the pot periodically to ensure it maintains a bare simmer without boiling.
Don’t stir the stock during cooking. Stirring can break down ingredients and incorporate particles that cloud the liquid. The gentle simmer does all the work without intervention.
As the stock cooks, the liquid level will drop through evaporation. This is normal and actually concentrates the flavors. If the level drops below the ingredients by more than an inch or two, you can add a bit more water.
Step 6: Strain Thoroughly
After four to six hours, the vegetables will look pale and lifeless, indicating they’ve given up their flavor to the stock. The chicken bones should be very soft, almost crumbling when pressed.
Remove the pot from heat and let it cool slightly for easier handling. Set a large fine-mesh strainer or colander over another large pot or heat-safe container. Carefully pour or ladle the stock through the strainer.
For the clearest stock, line your strainer with several layers of cheesecloth before straining. This catches even tiny particles that pass through a regular strainer. However, for most home cooking purposes, a fine-mesh strainer alone produces adequately clear stock.
Discard the solids. Don’t try to squeeze the solids to extract more liquid—this forces particles into the stock and makes it cloudy. The gentle straining approach yields clearer results.
Step 7: Cool and Store
Allow the strained stock to cool to room temperature before refrigerating. For food safety, you want to cool the stock quickly rather than leaving a large pot of warm liquid sitting out for hours.
The fastest cooling method involves creating an ice bath. Fill your sink with cold water and ice, then nestle the stock container in this ice bath. Stir the stock occasionally to promote even cooling. This can bring stock from hot to refrigerator-safe in thirty to forty-five minutes.
Alternatively, divide the hot stock into smaller containers, which cool more quickly than one large batch. Once the stock reaches room temperature, transfer it to the refrigerator.
Step 8: Defat (Optional)
After several hours of refrigeration, any fat in the stock will rise to the surface and solidify into a layer. You can easily lift off and discard this fat with a spoon. Some cooks prefer leaving a thin layer of fat on the stock, as it helps preserve freshness and can be incorporated into cooking.
Properly defatted stock appears clear and golden, with a jellied consistency when cold. This jelly-like texture indicates good gelatin content and confirms you’ve made excellent stock.
Step 9: Portion and Store
Transfer the defatted stock to storage containers. Glass jars work well for refrigeration, while plastic containers or heavy-duty freezer bags suit freezing. Leave headspace if using jars or rigid containers, as liquid expands when frozen.
Refrigerated stock keeps for four to five days. For longer storage, freeze stock for up to six months. Consider portioning stock into various sizes—ice cube trays for small amounts, one-cup portions for soups, and larger quantities for recipe use.
Multiple Cooking Methods
While stovetop simmering is traditional, other methods offer convenience and different advantages.
Slow Cooker Stock
The slow cooker provides the ultimate hands-off stock-making method. Combine all ingredients in the slow cooker crock, add water to within an inch of the top, and cook on low for ten to twelve hours or high for six to eight hours.
The consistent, low temperature produces excellent gelatin extraction without requiring any monitoring. You can start slow cooker stock before bed and wake to ready-to-strain liquid gold. The contained environment also creates less aromatic intensity in your kitchen compared to stovetop simmering.
The only downside is reduced evaporation in the closed environment, potentially producing slightly less concentrated stock than stovetop methods. However, the convenience factor often outweighs this minor consideration.
Pressure Cooker Stock
Modern electric pressure cookers like the Instant Pot revolutionize stock-making by reducing cooking time dramatically. What takes six hours on the stove requires only ninety minutes to two hours under pressure.
Combine all ingredients in the pressure cooker pot, add water to the maximum fill line, and secure the lid. Cook on high pressure for ninety minutes to two hours. Allow natural pressure release for at least thirty minutes before carefully releasing any remaining pressure manually.
The high-pressure environment extracts collagen efficiently, producing richly gelatinous stock in a fraction of traditional time. The sealed pot prevents evaporation, so pressure cooker stock contains more liquid relative to the ingredients used.
Some cooks find pressure cooker stock tastes slightly different from traditionally simmered versions—less complex but more intensely chickeny. Both methods produce excellent results; choose based on your available time and personal preference.
Oven-Baked Stock
For cooks who prefer avoiding stovetop space, oven baking offers an alternative. Combine all ingredients in a large Dutch oven or other oven-safe pot with a tight-fitting lid. Place in a 200°F oven and cook for eight to ten hours.
The gentle, even heat produces results similar to stovetop simmering without requiring burner space. This method works particularly well when you’re already using the oven for other long-cooking projects.
Restaurant-Style Concentrated Stock (Glace)
Professional kitchens often reduce stock further into a thick, syrupy glace (glaze) that stores easily and provides intense flavor in small quantities. After making stock normally, strain it and return the liquid to the pot. Simmer gently until reduced by half or more.
The concentrated glace becomes thick and dark. When chilled, it forms a firm, almost rubbery consistency. Small portions of glace add substantial flavor to sauces and braises. Store in small containers or ice cube trays for convenient portioning.
This technique requires monitoring to prevent scorching as the liquid reduces. Reduce heat progressively as the stock thickens.
Pro Tips for Superior Stock
These professional techniques elevate your stock from good to exceptional.
Blanch Bones for Clearer Stock
For the clearest possible stock, blanch bones before starting. Place bones in a pot, cover with cold water, and bring to a boil. Boil for five minutes, then drain and rinse the bones under cold water. This removes blood and impurities that would otherwise cloud the stock.
After blanching, proceed with the regular stock-making process using fresh water. This extra step makes a noticeable difference in clarity and produces restaurant-quality appearance.
Save and Freeze Scraps
Keep a gallon freezer bag in your freezer for collecting stock ingredients. Toss in chicken bones, vegetable trimmings (carrot peels, celery leaves, onion skins, parsley stems), and herb stems as you cook other meals.
When the bag fills up, dump the contents into your stock pot and proceed with stock-making. This approach maximizes the value of ingredients you’d otherwise discard while ensuring you always have stock components ready.
Avoid adding cruciferous vegetables, bitter greens, or starchy vegetables to your scrap bag. Stick to aromatic vegetables and herbs that enhance rather than muddy stock’s flavor.
Don’t Salt Your Stock
Resist the temptation to season stock with salt during cooking. Unsalted stock provides maximum versatility. When stock reduces in recipes, salted stock becomes increasingly salty and can quickly become unpalatably intense.
Season the final dish containing your stock rather than the stock itself. This approach gives you precise control over seasoning and prevents inadvertent over-salting.
Roast Bones for Richer Flavor
Roasting chicken bones before stock-making creates deeper, more complex flavor reminiscent of roasted chicken. The caramelization that occurs during roasting adds sweetness and color.
Roast bones at 400°F for forty-five minutes to one hour until well-browned but not burnt. You can roast vegetables alongside bones for even more roasted flavor. Deglaze the roasting pan with a little water and add this flavorful liquid to your stock pot.
Use roasted bone stock for hearty soups, stews, and gravies where the robust flavor enhances the dish. Reserve lighter stock made from raw bones for delicate sauces and risottos.
Freeze in Multiple Formats
Freeze stock in various portion sizes for maximum convenience. Pour stock into ice cube trays, and once frozen, transfer cubes to freezer bags. These cubes provide perfect one-tablespoon portions for deglazing pans or adding flavor to small quantities of vegetables.
Freeze one-cup or two-cup portions in containers or bags for recipes requiring specific amounts. Also freeze some larger quantities (four to six cups) for making soups or cooking grains.
Flat-frozen bags stack efficiently in the freezer and thaw relatively quickly. Fill bags partway, seal while removing air, then lay flat on a baking sheet to freeze. Stack frozen bags to save space.
Test Gelatin Content
Well-made stock should gel firmly when refrigerated, indicating successful collagen extraction. The firmer the gel, the more gelatin your stock contains. If your chilled stock remains completely liquid, it lacks gelatin.
Insufficient gelatin usually results from too little bone content, cooking time that’s too short, or bones that don’t contain much collagen. Increase bone quantity, extend cooking time, or add collagen-rich parts like chicken feet to improve gelation.
While liquid stock still contains flavor and nutrients, the gelatinous texture provides superior body and mouthfeel in finished dishes.
Using Chicken Stock in Cooking
Understanding how to deploy your homemade stock maximizes its impact on your cooking.
Soups and Stews
This represents stock’s most obvious application. Use it as the base for virtually any soup, from simple chicken noodle to complex French onion. The stock’s rich flavor means you need fewer additional seasonings to create satisfying depth.
For cream-based soups, use stock as the liquid component before adding cream. The stock provides the savory foundation that prevents cream soups from tasting flat or one-dimensional.
In stews, stock serves as the braising liquid that tenderizes meat while creating flavorful sauce. The gelatin content helps thicken the liquid naturally as it reduces.
Cooking Grains and Legumes
Replace water with stock when cooking rice, quinoa, farro, barley, or any other grain. This simple substitution dramatically improves flavor without requiring additional effort. The grains absorb the stock’s savory qualities, transforming them from bland filler to tasty side dish.
Use stock for cooking dried beans and lentils as well. The enhanced flavor makes simple bean dishes much more appealing. This works particularly well for making refried beans, where the stock’s richness shines through.
Deglazing and Pan Sauces
After searing meat, deglaze the pan with stock to capture all those flavorful browned bits stuck to the bottom. The stock dissolves these bits while forming the foundation for quick pan sauces.
Add stock to the hot pan, scrape up the browned bits with a wooden spoon, then reduce until slightly thickened. Finish with butter, cream, or herbs for an elegant sauce that takes minutes to prepare.
Braising Liquid
Stock provides ideal braising liquid for meats and vegetables. Braise chicken thighs, pork chops, short ribs, or pot roasts in stock for incredibly flavorful results. The meat becomes tender while the stock reduces and concentrates, creating ready-made sauce.
Vegetables like fennel, leeks, endive, and celery hearts also braise beautifully in stock. The gentle cooking preserves their texture while infusing them with savory flavor.
Enriching Sauces
Add body and depth to any sauce by incorporating stock. Gravies, velouté, and pan sauces all benefit from stock’s gelatin content and complex flavor.
For thicker sauces, reduce stock before adding it, or add it to a roux for classic preparations. The stock’s natural gelatin provides body without requiring excessive thickeners.
Wilting Greens
Instead of using plain water to wilt spinach, chard, or kale, use a small amount of stock. The greens absorb the savory flavor while cooking down. This simple trick transforms simple sautéed greens into something special.
Use just enough stock to create steam and prevent sticking—usually a quarter to half cup for a large bunch of greens.
Making Risotto
Authentic risotto requires warm stock added gradually to arborio rice. The stock’s gradual incorporation creates risotto’s characteristic creamy texture while infusing the rice with flavor.
Keep stock simmering in a separate pot while making risotto so each addition maintains the cooking temperature. Cold stock added to hot risotto slows cooking and affects texture.
Freezing Stock in Recipe-Ready Portions
Freeze stock in the exact quantities your favorite recipes require. If you frequently make recipes calling for three cups of stock, freeze three-cup portions. This eliminates measuring and speeds up cooking.
Troubleshooting Common Issues
Even experienced cooks sometimes encounter problems with stock. Here’s how to identify and fix common issues.
Cloudy Stock
Cloudy stock results from several potential causes. Boiling stock vigorously emulsifies fat and breaks down ingredients, creating cloudiness. Always maintain a bare simmer rather than a rolling boil.
Insufficient skimming allows proteins and impurities to dissolve into the liquid. Skim diligently during the first hour of cooking.
Stirring stock during cooking also contributes to cloudiness by breaking down ingredients and incorporating particles. Let the stock simmer undisturbed.
For clearer stock next time, blanch bones first and strain through cheesecloth. While cloudy stock tastes fine and cooks perfectly well, clear stock has more professional appearance.
Stock Won’t Gel
Liquid stock that doesn’t gel when refrigerated lacks sufficient gelatin. This happens when stock contains too few bones relative to water, doesn’t cook long enough, or uses bones with low collagen content.
Increase the ratio of bones to water—use four pounds of bones for every gallon of water instead of three. Add collagen-rich parts like chicken feet, wings, or backs. Extend cooking time to six hours or longer.
Remember that bones from older chickens contain more collagen than those from young chickens. If possible, seek out older stewing hens for maximum gelatin content.
Weak or Bland Flavor
Watery, flavorless stock usually indicates too much water relative to bones and vegetables, or insufficient cooking time. Reduce the amount of water in your next batch so bones and vegetables are just barely covered.
Extend cooking time to allow more flavor extraction. Roast bones before stock-making for deeper, richer flavor. Ensure you’re using enough aromatic vegetables—don’t skimp on onions, carrots, and celery.
As a fix for already-made weak stock, simmer it gently to reduce the volume and concentrate flavors. Reduce by one-quarter to one-half for noticeably improved flavor.
Greasy Stock
Excess fat makes stock unpleasant and affects its performance in recipes. Always remove the fat layer after refrigeration. The cold, solid fat lifts off easily with a spoon.
If you need to use stock immediately without time for refrigeration and defatting, use a fat separator pitcher. Pour hot stock into the separator and allow fat to rise. The spout draws from the bottom, leaving fat behind.
Alternatively, lay paper towels on the surface of hot stock. They’ll absorb surface fat in seconds. Replace towels and repeat until minimal fat remains.
Stock Tastes Bitter
Bitter stock results from overcooking vegetables, using too many herbs, or including vegetables that become bitter with long cooking. Avoid cooking stock longer than eight hours, as vegetables begin breaking down and releasing bitter compounds.
Use parsley stems sparingly and avoid adding the leaves. Don’t include cruciferous vegetables like cabbage or Brussels sprouts. Remove vegetables after four hours if cooking stock for longer periods.
Stock Develops Off-Flavors
If stock tastes or smells strange, the ingredients may have been past their prime. Always use fresh bones and vegetables. If using saved scraps, ensure they were frozen promptly and haven’t suffered freezer burn.
Cool and refrigerate stock promptly after straining. Stock left at room temperature for extended periods can develop off-flavors or spoil. Follow proper food safety guidelines for cooling and storage.
Storage and Food Safety
Proper handling ensures your stock remains safe and maintains quality.
Refrigeration Guidelines
Store stock in clean, food-safe containers with tight-fitting lids. Glass jars, plastic storage containers, or even covered bowls work well. Refrigerated stock keeps safely for four to five days.
For best quality, use refrigerated stock within three days. After that, the flavor begins deteriorating, though it remains safe if stored properly.
Always smell stock before using. Fresh stock has a pleasant, meaty aroma. If it smells sour, fermented, or otherwise off, discard it regardless of how long it’s been stored.
Freezing for Long-Term Storage
Frozen stock maintains quality for six months, though it remains safe indefinitely at 0°F. Use heavy-duty freezer bags, rigid plastic containers, or glass jars designed for freezing.
Leave one inch of headspace in rigid containers to allow for expansion. Remove as much air as possible from freezer bags before sealing to prevent freezer burn.
Label containers with the date and contents. Even though you know it’s chicken stock now, identifying containers becomes difficult after a month in the freezer.
Thawing Safely
The safest thawing method involves transferring frozen stock to the refrigerator overnight. Plan ahead so your stock thaws in time for cooking.
For faster thawing, place sealed containers or bags in cold water, changing the water every thirty minutes. Stock in flat-frozen bags thaws relatively quickly this way.
You can also add frozen stock directly to hot preparations like soups and stews. Break frozen stock into chunks if possible to speed melting.
Avoid thawing stock at room temperature, as this allows the exterior to reach unsafe temperatures while the interior remains frozen.
Reheating Stock
Bring refrigerated or thawed stock to a full boil before using if it won’t be cooked further in your recipe. This kills any bacteria that may have developed during storage.
For stock being added to cooking recipes, you can add it cold or at room temperature since it will reach safe temperatures during the cooking process.
Never repeatedly reheat and cool stock. Portion it appropriately so you only thaw and use what you need for each recipe.
Frequently Asked Questions
How long should I cook chicken stock?
Four to six hours produces excellent results for traditional stovetop stock. Longer cooking (up to eight hours) extracts more gelatin but risks vegetables becoming bitter. Slow cookers can cook safely for ten to twelve hours on low, while pressure cookers need only ninety minutes to two hours.
Can I reuse chicken bones to make a second batch?
After four to six hours of cooking, bones have released most of their flavor and collagen. A second batch will produce much weaker stock. However, some cooks do make a lighter “remouillage” (rewetting) by simmering the bones again with fresh water and vegetables for several more hours.
Should I add salt to my stock?
No. Unsalted stock provides maximum versatility since it reduces during cooking and concentrates flavors. Salted stock can quickly become too salty when reduced. Season the final dish containing stock rather than the stock itself.
Why isn’t my stock gelatinous?
Stock that doesn’t gel lacks sufficient gelatin from bones. Use more bones relative to water (four pounds per gallon), cook longer (minimum four hours), add collagen-rich parts like chicken feet or wings, and ensure your bones come from mature chickens rather than young birds.
Can I make stock from cooked chicken bones?
Yes! Leftover rotisserie chicken carcasses make wonderful stock. You can even collect and freeze cooked bones from multiple meals until you have enough for a batch. Cooked bones produce slightly different flavor than raw bones but still create excellent stock.
What vegetables should I avoid in stock?
Skip cruciferous vegetables (broccoli, cauliflower, cabbage, Brussels sprouts), which become bitter and sulfurous. Avoid beets (they turn stock pink), potatoes and other starchy vegetables (they create cloudiness), bell peppers (too dominant), and tomatoes (they make stock acidic and change the color).
How do I know when stock is done?
Stock is ready when bones feel very soft and vegetables appear pale and lifeless, indicating they’ve released their flavor. The liquid should have reduced somewhat and developed rich color. Taste it—finished stock should have robust, savory flavor. Check that it gels when chilled for confirmation of good gelatin content.
Can I pressure can chicken stock?
Yes, chicken stock can be safely pressure canned following proper procedures. Process pints for twenty minutes or quarts for twenty-five minutes at ten pounds pressure (adjust for altitude). Always follow tested recipes from sources like the USDA or National Center for Home Food Preservation.
What’s the white stuff floating in my stock?
The foam and scum that rises during cooking consists of proteins and impurities from the bones and meat. Skim it off regularly during the first hour of cooking for clearer, cleaner-tasting stock. This material is harmless but affects appearance and can contribute slightly bitter flavors.
Can I make stock without vegetables?
Yes. While vegetables add sweetness and complexity, bones alone produce flavorful stock. This approach works well when you want very clean, pure chicken flavor for specific recipes. Chinese cooking often uses simple bone stock without Western aromatic vegetables.
Creative Uses Beyond Traditional Applications
Think beyond soups and sauces to get maximum value from your homemade stock.
Flavorful Ice Cubes
Freeze stock in ice cube trays, then add a cube to sautéing vegetables, deglazing pans, or enriching sauces. These portion-controlled flavor bombs provide instant enhancement without thawing large quantities of stock.
Keep stock cubes in a labeled freezer bag for easy access. They’re particularly useful for single-serving meals or when you need just a small amount of liquid for cooking.
Poaching Liquid
Use stock instead of water for poaching chicken breasts, fish, or eggs. The flavored liquid infuses the protein with subtle savory notes while keeping it moist and tender.
Save the poaching liquid afterward—it now contains even more flavor and can be reused or added to soups and sauces.
Cooking Dried Fruits
Rehydrate dried fruits like raisins, apricots, or cherries in warm stock for savory applications. This creates a sweet-savory component for grain salads, stuffings, or serving alongside roasted meats.
The fruit absorbs savory notes while maintaining its sweetness, creating complex flavor that elevates simple dishes.
Steaming Vegetables
Add stock to the bottom of your steamer basket instead of water. As vegetables steam, they absorb aromatic vapors from the stock, gaining subtle flavor enhancement.
This technique works particularly well with neutral vegetables like green beans, cauliflower, or broccoli that benefit from additional flavor.
Making Compound Butters
Reduce stock to a thick, syrupy glace, then blend it with softened butter. This creates a compound butter bursting with savory flavor perfect for finishing steaks, tossing with pasta, or spreading on bread.
The concentrated stock flavor permeates the butter, creating a versatile enhancement for numerous dishes.
Hydrating for Health
Sip warm, seasoned stock as a nutritious, low-calorie beverage. Add a pinch of salt, some pepper, and perhaps a squeeze of lemon for a comforting, healthful drink.
This practice, popular in traditional diets and modern wellness communities, provides hydration along with minerals, amino acids, and gelatin.
Conclusion
Mastering homemade chicken stock represents a milestone in any cook’s journey. This fundamental preparation enhances countless dishes while providing nutritional benefits and representing economical kitchen wisdom. The time invested in learning proper stock-making techniques pays dividends through improved cooking results and deeper understanding of culinary foundations.
The beauty of stock lies in its simplicity. Despite seeming complex, it requires only basic ingredients, minimal active effort, and patience while gentle heat works its magic. Once you experience the difference homemade stock makes in your cooking, returning to commercial alternatives feels impossible.
Start your stock-making practice today. Collect chicken bones from your next roasted chicken dinner, gather aromatic vegetables, and dedicate a few hours to creating liquid gold. Your kitchen will fill with wonderful aromas, your freezer will stock up with valuable cooking liquid, and your future dishes will taste markedly better.
Remember that practice improves results. Your first batch might not achieve perfection, but you’ll learn valuable lessons about timing, heat control, and ingredient balance. Each subsequent batch brings you closer to intuitive understanding of this essential technique.
The satisfaction of ladling homemade stock into soups, sauces, and countless other preparations makes every minute of preparation worthwhile. You’ll taste the difference, feel good about the nutrition and economy, and take pride in creating restaurant-quality foundation ingredients in your own kitchen.
Happy cooking, and enjoy the rich, flavorful rewards of your homemade chicken stock!